A 12-factor App in OpenShift – Deep Dive
27/03/2018, by Justin Cook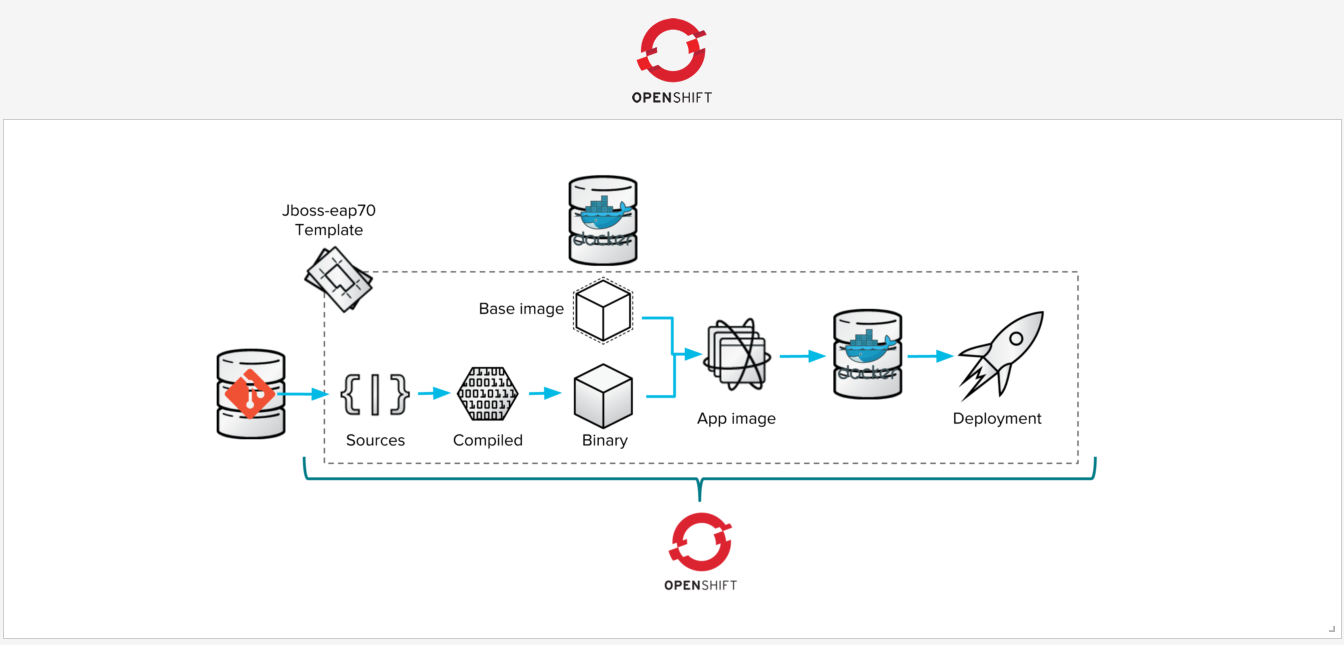
A 12-factor App in OpenShift – Deep Dive
The 12-factor app methodology has an incredible grip on the software industry. It is the realisation of fantastic portability across cloud-based resources and application artifacts. Not only has the entire stack become easily implemented in code, it is declarative and incredibly robust when configured with idempotent management systems. It’s mesmerising that once upon a time in a daily grind not far gone, operations personnel had to work alongside developers and hardware personnel to provision and configure kit to get started. Instead, we take a look at developing and deploying an application that enables debugging and interfacing with multiple cloud providers which support the Kubernetes ecosystem – in our case OpenShift.
Follow Along
If you’d like to follow along, you need a workstation capable of running your favourite IDE, Java, and a virtual machine. Here we use VirtualBox. In order to follow along, you can use Minishift or the official CDK released by Red Hat. In order to use the latter, you will need a Red Hat Developer Subscription. Here, we use the CDK. To build the software, we use Apache Maven. Finally, we use Git to fetch source code from repositories.
Many web applications are written in Java and delivered as a WAR, or web application resource, file. Many of these are developed using the Spring Framework. Given this is a formidable representation of web application estates, we’ll show just how much convergence the toolchain has experienced.
Setup Local Environment
To get started, we begin the same way everyone should, and that’s with “Hello World” – it’s never let anyone down. To make things easy, the Spring Boot project provides an example in the Spring Boot GitHub repository. We start by cloning this repository.
>>> (03:40 pm) (jcook@Justins-MacBook-Pro) (0/ttys004) (~/play/openshift)
$ git clone https://github.com/spring-projects/spring-boot.git
Cloning into 'spring-boot'...
remote: Counting objects: 348794, done.
remote: Compressing objects: 100% (73/73), done.remote: Total 348794 (delta 48), reused 74 (delta 39), pack-reused 348679
Receiving objects: 100% (348794/348794), 72.44 MiB | 3.57 MiB/s, done.
Resolving deltas: 100% (144733/144733), done.
Now we have the entire source for Spring Boot. There are a plethora of examples in the spring-boot-samples directory. As previously mentioned, we will change directories to the spring-boot-sample-war subdirectory and apply the following patch to the pom.xml file:
diff --git a/spring-boot-samples/spring-boot-sample-war/pom.xml b/spring-boot-samples/spring-boot-sample-war/pom.xml
index 65276f61ce..22b2fda653 100644
--- a/spring-boot-samples/spring-boot-sample-war/pom.xml
+++ b/spring-boot-samples/spring-boot-sample-war/pom.xml
@@ -5,8 +5,8 @@
	<parent>
		<!-- Your own application should inherit from spring-boot-starter-parent -->
		<groupId>org.springframework.boot</groupId>
-               <artifactId>spring-boot-samples</artifactId>
-               <version>${revision}</version>
+               <artifactId>spring-boot-starter-parent</artifactId>
+               <version>2.0.0.RELEASE</version>
	</parent>
	<artifactId>spring-boot-sample-war</artifactId>
	<packaging>war</packaging>
Now, we are able to build a WAR file using Maven. In the same directory, we use the Maven goal to build the package.
>>> (06:48 pm) (jcook@Justins-MacBook-Pro) (0/ttys004) (~/play/openshift/spring-boot/spring-boot-samples/spring-boot-sample-war)
$ mvn -U clean package
[INFO] Scanning for projects...
...
[INFO]
[INFO] Results:
[INFO]
[INFO] Tests run: 1, Failures: 0, Errors: 0, Skipped: 0
[INFO]
[INFO]
[INFO] --- maven-war-plugin:3.1.0:war (default-war) @ spring-boot-sample-war ---
[INFO] Packaging webapp
[INFO] Assembling webapp [spring-boot-sample-war] in [/Users/jcook/play/openshift/spring-boot/spring-boot-samples/spring-boot-sample-war/target/spring-boot-sample-war-2.0.0.RELEASE]
[INFO] Processing war project
[INFO] Copying webapp resources [/Users/jcook/play/openshift/spring-boot/spring-boot-samples/spring-boot-sample-war/src/main/webapp]
[INFO] Webapp assembled in [104 msecs]
[INFO] Building war: /Users/jcook/play/openshift/spring-boot/spring-boot-samples/spring-boot-sample-war/target/spring-boot-sample-war-2.0.0.RELEASE.war
[INFO]
[INFO] --- spring-boot-maven-plugin:2.0.0.RELEASE:repackage (default) @ spring-boot-sample-war ---
[INFO] ---------------------------------------------------------------------
[INFO] BUILD SUCCESS
[INFO] ---------------------------------------------------------------------
[INFO] Total time: 6.643 s
[INFO] Finished at: 2018-03-25T18:51:45+01:00
[INFO] Final Memory: 36M/311M
[INFO] ---------------------------------------------------------------------
If we inspect the target subdirectory, we should see – amongst other things – the WAR file. In this case it is spring-boot-sample-war-2.0.0.RELEASE.war. This is nice, but let’s see it running, shall we? There are several ways to do that. But, our project will be running on OpenShift, which is Kubernetes. Thankfully, the OpenShift community make Minishift and Red Hat make the CDK available. Result! Our life as a developer is much easier.
Setup “The Cloud”
>>> (06:50 pm) (jcook@Justins-MacBook-Pro) (0/ttys004) (~/play/openshift/spring-boot/spring-boot-samples/spring-boot-sample-war)
$ minishift start-- Starting profile 'minishift'
...
The server is accessible via web console at:
https://192.168.99.100:8443
You are logged in as:
User:     developer
Password: <any value>
To login as administrator:
oc login -u system:admin
-- Waiting for persistent volumes to be created ... OK
-- Applying addon 'anyuid':.
Add-on 'anyuid' changed the default security context constraints to allow pods to run as any user.
Per default OpenShift runs containers using an arbitrarily assigned user ID.
Refer to https://docs.openshift.org/latest/architecture/additional_concepts/authorization.html#security-context-constraints and
https://docs.openshift.org/latest/creating_images/guidelines.html#openshift-origin-specific-guidelines for more information.
-- Applying addon 'eap':...
-- Applying addon 'fuse':...............
-- Applying addon 'admin-user':..
Ok, this is exciting! We have a WAR file and an OpenShift instance. At this point, we need to configure our project in OpenShift. The CDK has created a project for us. So, we can move on and create all the necessary objects.
>>> (07:15 pm) (jcook@Justins-MacBook-Pro) (0/ttys004) (~/play/openshift/spring-boot/spring-boot-samples/spring-boot-sample-war)
$ oc project
Using project "myproject" on server "https://192.168.99.101:8443".
Uber Convergence
Things are looking great. But, we want to work in our well-known development environment on our own machine, make changes, create artifacts, and see it work at our convenience. After we are confident our code meets requirements, we can commit and push to origin then let a CI/CD pipeline take it from there. In order to expedite delivery of code, OpenShift provides binary builds. This simply means the source will come in binary form allowing one to skip the entire CI/CD pipeline. But, there are no build strategies for WAR files. That’s not necessarily a bad thing given we intend to use Kubernetes which is a container orchestrator.
We need to get our WAR file in a container image. It’s a good thing OpenShift provides Docker build strategies, and since we are using a binary build, we can create the necessary environment right on our local machine and push it to a node in the cloud to build the image. In this case, the node is on our local machine. This is getting even better! In order to use the Docker build strategy, we need to provide that information, and the most flexible way of doing that is creating a Dockerfile in our current directory. The build will see the Dockerfile and use the Docker strategy.
FROM jetty:alpine
MAINTAINER <redacted>@secnix.com
ENV JAVA_OPTIONS -Xmx256m
ADD target/spring-boot-sample-war-2.0.0.RELEASE.war /var/lib/jetty/webapps/ROOT.war
EXPOSE 8080
USER jetty
ENTRYPOINT ["/docker-entrypoint.sh"]
CMD ["java","-jar","/usr/local/jetty/start.jar"]
This Dockerfile is short and very sweet. Some things to note is this simply uses the small Jetty Alpine image, assigns 256m RAM, copies the WAR file to the webapps directory as ROOT.war and exposes port 8080. Now we have everything in place to containerise our WAR file and run it in Kubernetes right on our personal machine – or any Kubernetes node.
The next step is creating the relevant objects in OpenShift to manage the application lifecycle. The first one is a BuildConfig which in turn creates an ImageStream to manage the image. Once this is created, the BuildConfig remains static, but the source – which is a binary archive from your local computer – is not reusable. Each build will need to be created by the current binaries.
>>> (07:22 pm) (jcook@Justins-MacBook-Pro) (0/ttys004) (~/play/openshift/spring-boot/spring-boot-samples/spring-boot-sample-war)
$ oc new-build --binary --name=my12factorapp
* A Docker build using binary input will be created
* The resulting image will be pushed to image stream "my12factorapp:latest"
* A binary build was created, use 'start-build --from-dir' to trigger a new build
--> Creating resources with label build=my12factorapp ...
imagestream "my12factorapp" created
buildconfig "my12factorapp" created
--> Success
The Final Stretch
Now we have everything ready to create an image. We simply issue the `oc start-build …` command which instantiates a new build from the existing BuildConfig we created in the previous step. This command will archive your current local directory, transfer it to the build node, and execute the build as instructed in the BuildConfig. On success, the image is pushed to the registry.
>>> (07:44 pm) (jcook@Justins-MacBook-Pro) (0/ttys004) (~/play/openshift/spring-boot/spring-boot-samples/spring-boot-sample-war)
$ oc start-build my12factorapp --from-dir=. --follow
Uploading directory "." as binary input for the build ...
build "my12factorapp-1" started
Receiving source from STDIN as archive ...
Step 1 : FROM jetty:alpine
---> f4e374463672
Step 2 : MAINTAINER [email protected]
---> Using cache
---> 02ad788c95c7
Step 3 : ENV AB_OFF true
---> Using cache
---> a69c85df8ee7
Step 4 : ENV JAVA_OPTIONS -Xmx256m
---> Using cache
---> cb48baea6c1b
Step 5 : ADD target/spring-boot-sample-war-2.0.0.RELEASE.war /var/lib/jetty/webapps/ROOT.war
---> Using cache
---> bc280ab639c1
Step 6 : EXPOSE 8080
---> Using cache
---> f39e1b10c8b6
Step 7 : USER jetty
---> Using cache
---> 57b3ac3023a1
Step 8 : ENTRYPOINT /docker-entrypoint.sh
---> Using cache
---> 397edd5de644
Step 9 : CMD java -jar /usr/local/jetty/start.jar
---> Using cache
---> 6a0d13d3fa80
Step 10 : ENV "OPENSHIFT_BUILD_NAME" "my12factorapp-1" "OPENSHIFT_BUILD_NAMESPACE" "myproject"
---> Running in 56c8af1c0579
---> ff4839efeb52
Removing intermediate container 56c8af1c0579
Step 11 : LABEL "io.openshift.build.name" "my12factorapp-1" "io.openshift.build.namespace" "myproject"
---> Running in 9c23a7a0cae2
---> c6c8e05ae210
Removing intermediate container 9c23a7a0cae2
Successfully built c6c8e05ae210
Pushing image 172.30.1.1:5000/myproject/my12factorapp:latest ...
Pushed 4/11 layers, 36% complete
Pushed 5/11 layers, 45% complete
Pushed 6/11 layers, 55% complete
Pushed 7/11 layers, 64% complete
Pushed 8/11 layers, 73% complete
Pushed 9/11 layers, 82% complete
Pushed 10/11 layers, 91% complete
Pushed 11/11 layers, 100% complete
Push successful
Now we have all artifacts in place. We simply need to instruct OpenShift to instantiate and publish the app. There is more than one way to do this, but the easiest and most convenient method is use a generator such as `oc new-app …`. This generator creates a DeploymentConfig which in turn creates a ReplicationController that directs pods be created. Finally, it assigns labels and creates a Service which uses a selector to load balance traffic across pods that match the labels.
>>> (07:50 pm) (jcook@Justins-MacBook-Pro) (0/ttys004) (~/play/openshift/spring-boot/spring-boot-samples/spring-boot-sample-war)
$ oc new-app my12factorapp
--> Found image eb1c67c (About a minute old) in image stream "myproject/my12factorapp" under tag "latest" for "my12factorapp"
* This image will be deployed in deployment config "my12factorapp"
* Port 8080/tcp will be load balanced by service "my12factorapp"
* Other containers can access this service through the hostname "my12factorapp"
--> Creating resources ...
deploymentconfig "my12factorapp" created
service "my12factorapp" created
--> Success
Application is not exposed. You can expose services to the outside world by executing one or more of the commands below:
'oc expose svc/my12factorapp'
Run 'oc status' to view your app.
Now pods are being created which will be load balanced by the service. Let’s access this service from our node by creating a Route which will allow traffic ingress external from the software-defined network the pods are running in.
>>> (07:55 pm) (jcook@Justins-MacBook-Pro) (0/ttys004) (~/play/openshift/spring-boot/spring-boot-samples/spring-boot-sample-war)
$ oc expose svc/my12factorapp --hostname my12factorapp.192.168.99.100.nip.io
route "my12factorapp" exposed
Finale
You may open your browser and access the hostname! You can open your terminal and access the hostname!
>>> (07:57 pm) (jcook@Justins-MacBook-Pro) (0/ttys004) (~/play/openshift/spring-boot/spring-boot-samples/spring-boot-sample-war)
$ curl my12factorapp.192.168.99.101.nip.io
Hello World!
Now, you can iterate over your code, `mvn -U clean package`, and `oc new-build …` as many times it takes to get it right. When you updated image is pushed, the DeploymentConfig triggers will automatically roll out the updated image!
We will finish by looking at all the objects this project has created in OpenShift:
>>> (08:02 pm) (jcook@Justins-MacBook-Pro) (0/ttys004) (~/play/openshift/spring-boot/spring-boot-samples/spring-boot-sample-war)
$ oc get all
NAME                         TYPE      FROM      LATEST
buildconfigs/my12factorapp   Docker    Binary    1
NAME                     TYPE      FROM             STATUS     STARTED        DURATION
builds/my12factorapp-1   Docker    Binary@7b24941   Complete   1 hours ago   24s
NAME                         DOCKER REPO                               TAGS      UPDATED
imagestreams/my12factorapp   172.30.1.1:5000/myproject/my12factorapp   latest    1 hours ago
NAME                              REVISION   DESIRED   CURRENT   TRIGGERED BY
deploymentconfigs/my12factorapp   1          1         1  config,image(my12factorapp:latest)
NAME                   HOST/PORT                             PATH      SERVICES        PORT       TERMINATION   WILDCARD
routes/my12factorapp   my12factorapp.192.168.99.101.nip.io   my12factorapp   8080-tcp  None
NAME                        READY     STATUS        RESTARTS   AGE
po/my12factorapp-1-hp94v    1/1       Running       0          1h
NAME                 DESIRED   CURRENT   READY     AGErc/my12factorapp-1   0         0         0         1h
NAME                CLUSTER-IP     EXTERNAL-IP   PORT(S)    AGE
svc/my12factorapp   172.30.96.16   <none>        8080/TCP   1h
We sincerely hope this guide provides benefits to you on your journey to developing and deploying your app. We’re here to assist in any way we can.


Facebook Comments